Flower Bouquet Valentine Cake

I’m definitely in cake decorating mood, as you can see this is my 3rd post in a row… well I just started learn about it and find out that decorating with buttercream is so much fun.

The church community I involve in had a valentine luncheon last sunday, and I brought this cake as part of the celebration. Since the very beginning this cake was all about its decoration, I focused mostly on how it looked like than how it tasted like 🙂 … I wanted to use this cake as my learning canvas for some buttercream flower techniques I saw in pinterest. As you will see, there are variation of flowers and colors.


valentine cake 1


valentine cake 4


valentine cake 3


valentine cake 2


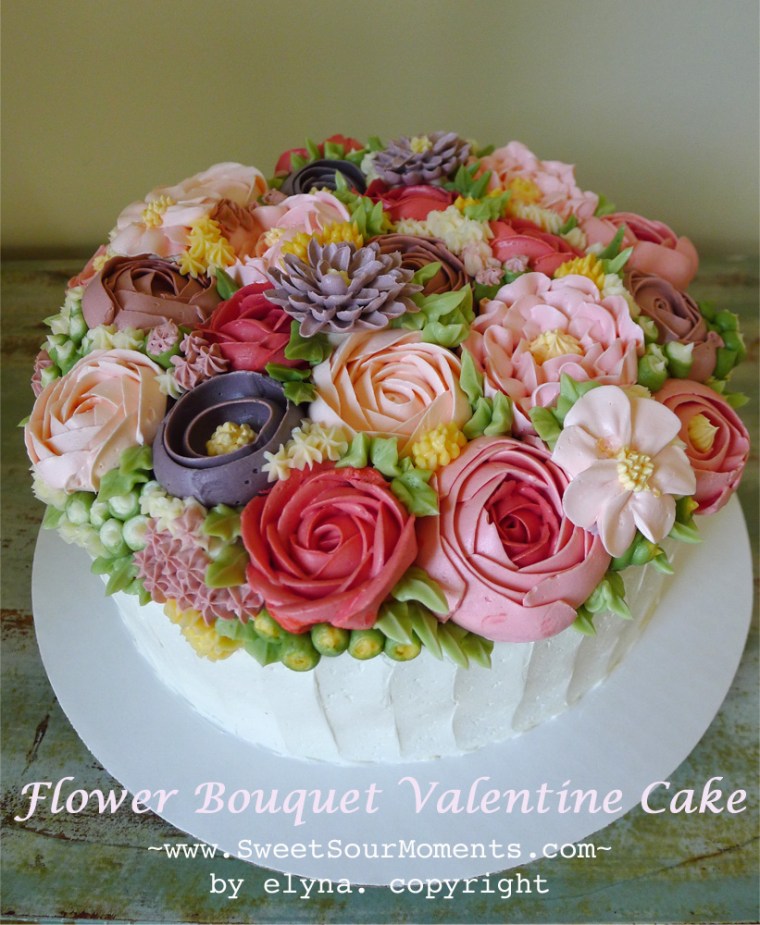
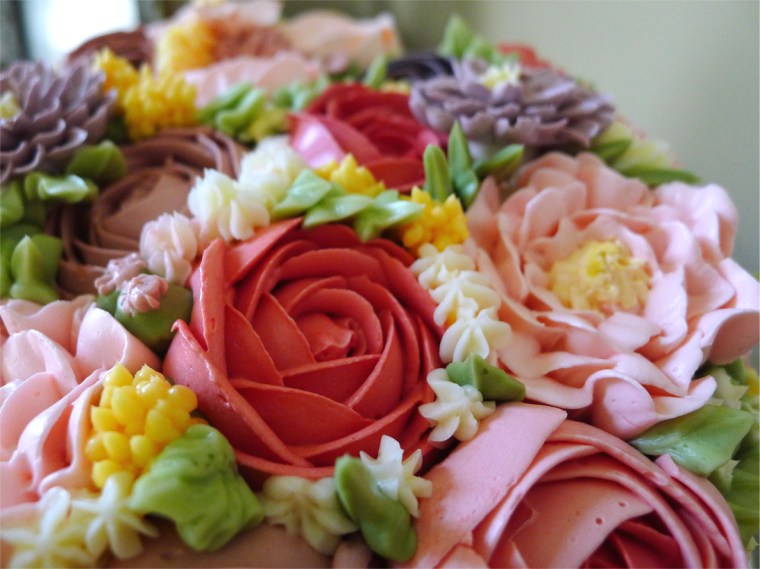
For the decoration portion alone I spent almost 4hours, major part was in mixing and testing the color. What can I say, I really enjoyed it.. didn’t feel that long when you did something that you like.

I’m pretty happy with the look 🙂

Happy Valentine, hope this inspires you!


valentine cake 5

Ladybug Birthday Cake

As I said before, I don’t have many occasions to make a cake that I can experiment with the cake decoration… so making this cake for my little one 3rd birthday was a big deal to me, not only because I got the chance to decorate it but also because this was the 1st time for me to make her birthday cake. For her 3rd birthday cake, the theme is ladybug… I also made her dress with ladybug theme, I will post it later.


ladybug cake 5


This was my 1st time to make fondant figure, ladybug… got the idea from pinterest. Lesson: wear gloves when mixing the color, it’s hard to clean once it stains our hands especially with red and black color.

ladybug cake 3


ladybug cake 1


ladybug cake 2


The buttercream I used was American buttercream which is mixture of butter, powdered sugar, and vanilla. I’m happy with the final result, more important I’m happy that my daughter loved it.


ladybug cake 4


Wall Stamp To Save Wrong Paint Color

I am currently decorating the last 2 rooms in the house, hadn’t done anything to them since moved here 4 years ago. For the guest room I was planning a minty green, very light and fresh, I picked the color and had a good feeling about it. Later that day I asked my husband for his opinion, he picked the one that’s 1 shade darker… well, since I asked him first I thought let’s just follow his pick. On the first couple rolls, I could see how dark it is, and after finished I felt like in the kinderganten or daycare room. Totally not what I picture the room would be in my mind. I didn’t want to redo the color, this room has many corners and borders that need detail works and I just didn’t have the energy to repaint.

How to make it elegant and comfortable for the guest ? .. without repaint. So here is what I did. I stamped the wall to get wallpaper effect, the wall where the head of the bed will be, to create a focal point and to distract the eyes from the greens. I used Martha Stewart Gold paint and am planning to add other gold accessories to tie the room together. On the future post I will let you see the finished room, so hope to see you checking my blog again.

1. Draw the pattern in the felt, I drew circle with asymmetric thickness. Cut it and glue to a piece of cardboard with the same shape, then glue a piece of styrofoam for handle.

2. This is the gold paint I used.

3. The stamping process.

4. The gold color really adds richness to the wall, like it!