DIY Felt Donuts

My second felt project, Felt Donuts… they look pretty real to my little one she thought they are really for her afternoon snack 🙂

This is very fun project to make, you can personalized the frosting and sprinkles or toppings to whatever your imagination tells you.


Felt Donuts 1


The main material is brown felt for the donuts, as for the frosting I used whatever left over felt I had… you can also use scrap fabric.

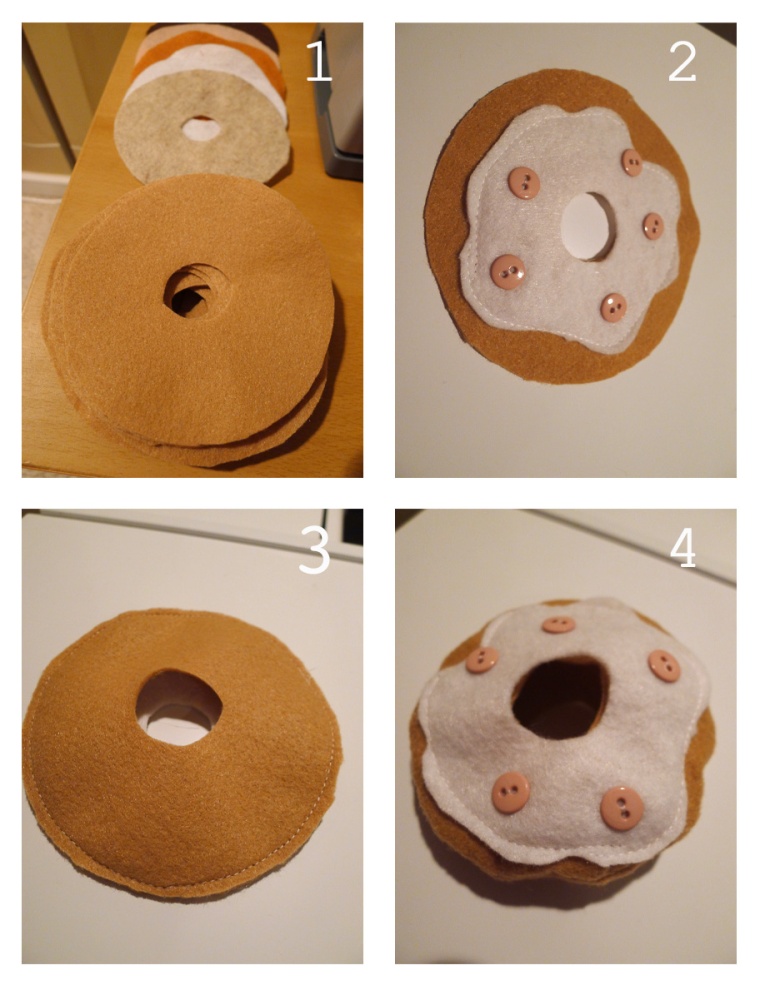
Here is the tutorial, the pictures aren’t too good since I made them in the night.


Felt donut 2

  1. Prepare the felt for the donuts and frosting. For each donut you need 2 brown felt and 1 frosting. People usually use Disc as template, for this donut I cut it a litte bit smaller.
  2. Cut the outer edge of frosting felt to irregular shape, attach the sprinkle or toppings( buttons, felt pieces, beads) then sew the piece to the brown felt as pictured.
  3. Put another piece of brown felt on the top, sew the outer edge together.
  4. Flip inside out.
  5. Fill it with stuffings and hand sew close the inner edges.
  6. Done!


felt donut 3

DIY All Seasons Felt Strawberry

My little one was very excited when we visited strawberry farm during strawberry picking season last May. Since then she often says “petik strawberry” which means picking strawberry and tries to describe what she saw and did in that farm with her very limited vocabulary, so cute. So I made these felt strawberries last week, named it all seasons felt strawberries… she can now have strawberry picking whenever she wants. It’s very easy to make, also a cute addition to her kitchen play. The basket was made from recycled paper brown bag, I don’t have the tutorial here but it is also very easy to make, pinterest has lots of tutorial of it.


Felt Strawberry fb

A. Cut the red felt in half circle, to get the size of my strawberry the diameter is 3″. Cut the green felt in star shape. Some poly filling for stuffing.

B. Sew the half circle’s ends together.

C. Turn it inside out. continue to stitch around the opening.

D. Put the stuffing, pull  and tighten the thread that you sew in C, secure with stitches.


FElt strawberry 2

The next step is to glue the Green felt onto the top to cover the opening, I use fabric glue. Done!


Plain Shirt Makeover with Bear Applique

You may have already known that my little girl loves bear and also known that I like to do some makeovers on plain shirt like this project, this project, and this project, so I thought this one would be perfect for her and me, Bear applique!


bear applique 1

Sewing cotton lace on shoulder.

bear applique 4

Crocheting bear ears.

bear applique 2

Some embroidery works for the nose and mouth, the eyes are from spare buttons, the face is from felt attached to the shirt with fusible lining.

bear applique 3

Hopefully it brings you inspiration!.