Crochet Baby Cloche – DIY

Happy New Year 2013!

In the last 2 days of last year finally I was able to check one of my 2012 resolution which is crocheting. It all began when I saw so many pins in pinterest about crochet projects… so cute and adorable, I wished I had somebody to teach me how to do it… well Mr. Google came to help.

Here is my second project, made it yesterday, took about 3 hours. Click here for the link to the pattern.

I can see crocheting is one of the way to meditate, saying prayer and wish in doing the stitches is really calming and relaxing, specially prayer for the person to whom this project is dedicated 🙂

Baby cloche

My CH, SC, DC, HDC, TC, SlTc practice. I bought the yarn months before during sale for $1, at that time I didn’t know that certain size of yarn needs certain hook and what material works best for what project, I just picked whatever available on sale.

baby cloche 1


First crochet, Rose.

baby cloche 5


Color combination for my second crochet project, Baby Cloche. I used the light and dark pink.

baby cloche 2

baby cloche 3

baby cloche 4

German Black Forest Cake

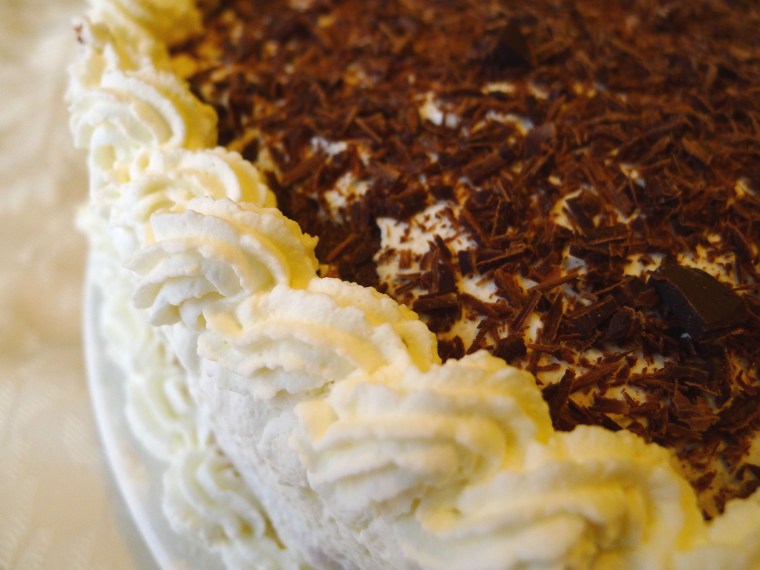
German Black Forest Cake (Schwarzwälder Kirschtorte = Black Forest cherry torte) is my all time favorite cake. I made this for my birthday last year and this year and also made the cupcake version for my office on valentine day.

german black forest


A. Cherry filling

1. Drain 1 can pitted black cherry, keep the syrup in a small pan. Take 3 tbsp of the syrup in a small bowl, mix with 2 tbsp of corn starch.

black forest 1

black forest 2

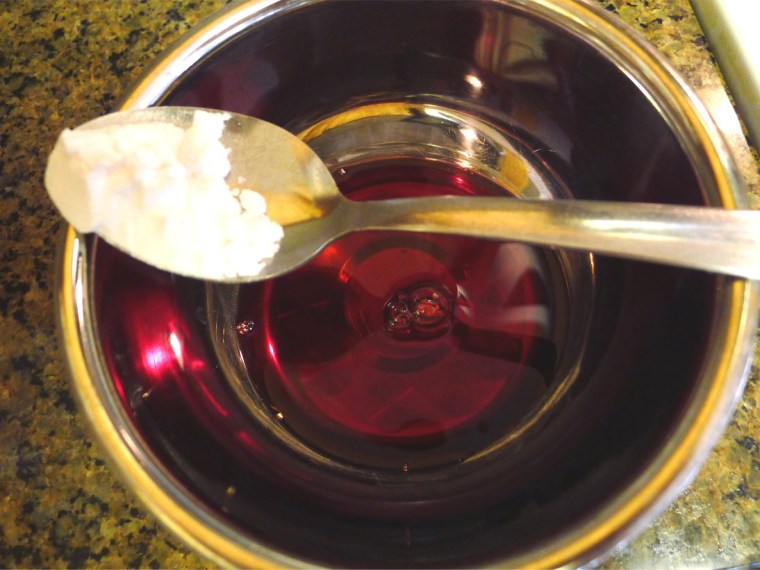
2. Bring to boil the remaining syrup in the small pan + 2 tbsp sugar (optional as preferred sweetness), lower the heat then slowly stir in the corn starch mixture, keep stirring to avoid lump.

black forest 3

3. Put the cherry into the pan, keep stirring until the liquid gets even thickness. Turn off the heat, let it cool.

black forest 4


B. The Cake

1. Sift 1/2 C cake flour + 1/3 C unsweetened cocoa powder, set aside. Melt 3 tbsp unsalted butter, set aside. ( I forgot to take the picture of melted butter 🙂 )

black forest 5

2. The eggs mixture: 1. Whisk 4 eggs + 2/3 C sugar. 2. Using double boiler method, put the egg mixture over the boiling water, keep whisking until you get lukewarm mixture. 3. Stir the mixture using high speed mixer, add 1 tsp of vanilla extract. 4. The batter should be pale and very thick.

black forest 6

3. Gently fold in the flour and melted butter alternately, make sure to use big stroke so that the batter won’t flatten.

black forest 7

4. Pour into 9″ pan (layered with parchment paper + butter), tap to remove excess air bubble, bake in 350F oven, test with toothpick.

black forest 8

black forest 9

5. Let the cake cool completely before divide into half.


C. Assembly

1. Brush 3 tbsp Kirschwasser, a clear liquor distilled from tart cherries. Here I used rum since I don’t have kirschwasser. Then put the cream layer followed by cherry filling and finish with cream layer before put the second layer of cake. For the cream: whisk 3 C heavy cream + 1 C powdered sugar (or as preferred sweetness).

black forest 10

2. Brush the top layer of cake with 3 tbsp of Kirschwasser before decorating. As you see I am not good at cake decoration, I wish I could make it look like the cake displayed in high end bakery 🙂

3. Bon Appétit.

black forest 11

black forest 12

Guest Bedroom Decor Revealed – DIY

Finally, guest bedroom project is finished, actually I finished it last month but hadn’t had chance to update the post for a while.

guest bedrppm reveal


The DIYs for this room can be found here :

circle wall stamp : https://sweetsourmoments.com/2012/10/25/wall-stamp-to-save-wrong-paint-color/

customized curtain : https://sweetsourmoments.com/2012/11/06/customized-store-bought-curtain/

pillow shams : https://sweetsourmoments.com/2012/11/05/pillow-sham-diy/

bedside table : https://sweetsourmoments.com/2012/11/08/budget-bedside-table-makeover-diy/


Simple & Easy Mocha Cake


1. Prepare :

  • 1/2 C vegetable oil
  • sift 1 C cake flour + 1/2 tsp baking powder (original version uses 1tsp baking powder and cream of tartar)
  • dissolve 1 tsp instant coffee + 1 tsp cocoa powder + 1 tsp water + 1 tsp vanilla


2.  Whisk  6 eggs (at room temperature)+ 1 C sugar until pale and creamy.


3. Pour the coffee mixture into egg mixture, followed by oil, beat until well combined.

4. Stir in flour mixture and gently fold until well blended. Divide the batter between 2, 9″round cake pans (line the bottom with parchment paper and put baking spray around the inside). Bake in 375 F oven about 20 minutes, check with toothpick.

5. For the filling cream : whisk 1 1/2 C heavy cream + powdered sugar (as your preferred sweetness) + 2 tbsp kahlua, coffee liqueur + 1 tbsp optional amaretto, almond liqueur.

6. Bon appétit!


Budget Bedside Table Makeover – DIY

So here is another project again as the result of wrong paint color in guest bedroom, remember that I need to adjust the decor to the gold circle accent wall? I was planning to have classic gold bedside table and I don’t want to buy something new just to be painted in gold, but it’s also not easy to find bedside table in the gold color that matches that gold accent wall. So the realistic way to accomplish the mission is to do the makeover. I actually not a big fan of painted furniture, I like to see the beauty of original wood grain and texture on it. Unfortunately, I have to paint this piece due to 2 reason: to match decor of the room and the bottom of the bedside table I bought was in bad shape. I’m quite happy with how it turns out, for my 1st furniture makeover, it’s not bad 🙂

1. The condition when I got it, for $5 from garage sale you can’t expect much.

2. A. cut the bottom part; B. put the primer coat; C & D. primer finished.

3. Attach the bracket for new leg. The new legs adds more classic look which I want.

4. Attach the painted gold leg.

5. Painting the 1st coat of gold and white.

6. After 3rd coat.

7. Add knobs which I got for less than $2 for all three of them (a steal from Worldmarket). Like the rustic look with gold accent.

8. I interchanged the direction of paint brush between vertical and horizontal to give this antique linen look.

9. Finished.